Tag Archives: Typography

Spring 2015 – 29 – Illustrator Text Week Day 3

Objective: Use the Appearance and Graphic Styles panels in Illustrator to produce expressive text.
Student Friendly Objective: I can use Illustrator to produce expressive text.

Web Link:
Adobe Illustrator CS5 Tutorial 37 | Appearances & Graphic Styles:


Topics Discussed:

  • Typography
  • Appearance Panel
  • Graphic Styles Panel
  • Post-Modernism


Assignment:

Watch the “Adobe Illustrator CS5 Tutorial 37 | Appearances & Graphic Styles” tutorial video. Follow the tutorial to learn how to use the Appearance Panel, and how to save object appearances as Graphic Styles.

Recall back in the first semester, when we watched Helvetica and discussed the differences between the Modernists and the Post-Modernists. The Modernists believed that text should not be expressive, and meaning should only be derived from the word itself (i.e. the word “dog” should not look like a “dog”) whereas Post-Modernists asked the question, why can’t the word “dog” look like a dog?

wwdog

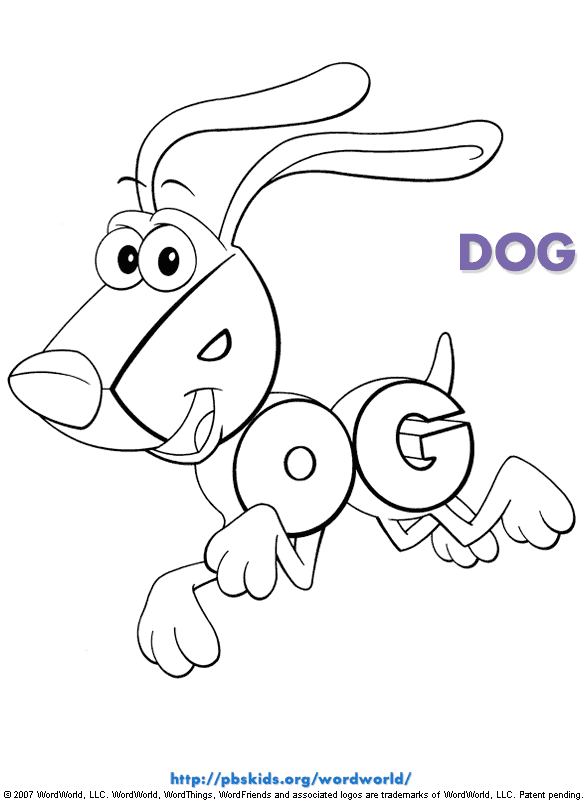
Text that visually looks like the thing it is describing is called Expressive Text, and Illustrator has special tools that make the production of Expressive Text extremely easy and effective. Today we are going to explore the use of these tools to produce some expressive text of our own.

    1. Watch the tutorial video to learn how to use the Appearance Panel, how to save object appearances as Graphic Styles, and how to access the pre-set Graphic Styles libraries.
    2. Open your Text Week document in Illustrator and go to the fourth artboard.
    3. Use the pre-set Graphic Styles libraries and the Type Tool to create five words that look like what is being described. For example:


Try to use different words and graphic styles than the ones in the example. When you have all five words and all of the previous assignments, save your work and place a copy of your Text Week Illustrator document in folder number 29 on the Student Temp Files server.


Assigned: March 9th, 2015
Due: March 10th, 2015

Spring 2015 – 29 – Illustrator Text Week Day 2

Objective:

Use web resources to define and explain Typeface Anatomy, and to identify the different parts of a typeface character.

Student Friendly Objective:

I can use the Internet to find out more about the different parts of type characters and what these parts are named.

Web Link:
Topics Discussed:

  • Typography
  • Letter Anatomy
  • Baseline
  • Meanline
  • X-height
  • Cap height
  • Ascender
  • Descender
  • Serifs
  • Stem
  • Bar
  • Bowl
  • Counter
  • Leg
  • Shoulder
Assignment:

Visit the About.com Graphic Design: Letter Anatomy website in the link provided. Read through the article to learn about Letter Anatomy, and the standard set of names for the parts of a letter.

    1. Open your Text Week document in Illustrator and go to the second artboard.
    2. For each of the thirteen vocabulary terms:
      1. Create a headline in Point Type with the vocabulary word itself
      2. Use Area Type to write the definition of the vocabulary word. Use complete sentences and your own words (do not copy and paste).
      3. Use Point Type and the line or shape tools to demonstrate what each of the vocabulary terms looks like. Use the pictures on the website as a guide, butDO NOT copy the website’s images into your document. Use a red-colored stroke on your lines and shapes to show the part of the letter the vocabulary word is describing.


  1. You should have a headline, a definition and a graphic for each of the following terms:
    • Baseline
    • Meanline
    • X-height
    • Cap height
    • Ascender
    • Descender
    • Serifs
    • Stem
    • Bar
    • Bowl
    • Counter
    • Leg
    • Shoulder
  2. If you run out of room on your second artboard, you may use your third artboard, but do not use more than two artboards for this assignment. Save your document. We will continue to work with this document throughout the week.


Assigned: March 5th, 2015

Due: March 7th, 2015